Cutting video generation from 80 seconds to 43: every change tried, with the measurements
The whole optimisation written out: what to measure first, where the bottleneck actually was, the three changes made, what each one saved, and which plausible-sounding ideas were deliberately not done.
2026-08-20 作者 William Hsu
Measure first, then change
This model exposes a sampling-step count, and instinct says lowering it makes things faster. The measurements said otherwise.
ComfyUI reports per-node progress over a websocket while it runs, so I logged the time of every stage of one three-second clip:
| Stage | Time |
|---|---|
| Reading the photograph (text / image encoders) | about 17.7 s |
| Sampling (the step that actually animates it) | about 11 s |
| VAE decode (developing the result into frames) | about 11.4 s |
| The rest | moving model weights into the card |
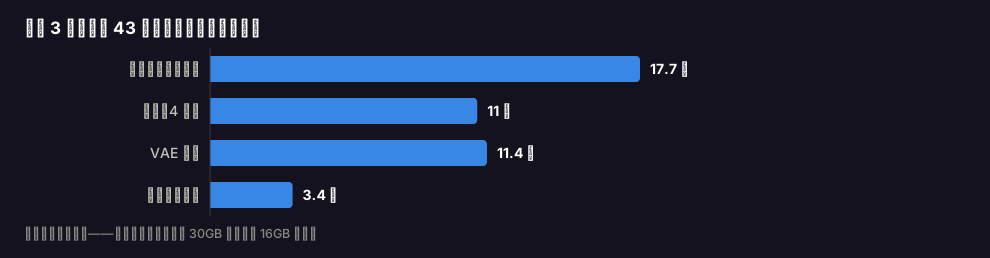
Sampling is about a quarter of the total, so cutting steps can only save so much.
The bottleneck is a 30 GB model going into a 16 GB card
The card is an RTX 5070 Ti with 16 GB of video memory. The text encoder plus the main model is over 30 GB on its own, which does not fit, so every run streams the weights into the card.
The time goes on moving data, not on arithmetic. All three changes below push in the same direction: make the thing that has to be moved smaller.
Change one: a smaller text encoder
Swapping 25.3 GB for a 14.6 GB quantised build means over 10 GB less to move every time. Of the three changes this one did the most.
Quantisation should in theory cost image quality. I ran a before-and-after on the same random seed — same photo, same motion, same seed — and side by side the results are indistinguishable. Fixing the seed is essential; without it two runs differ anyway and the comparison means nothing.
Change two: sampling from 6 steps to 4
It looks like cutting corners, but the acceleration LoRA in use was designed for 4 steps. Running 6 does not make it better, only slower. That parameter had been carried over from a different setup and did not match this model.
Change three: dropping an audio decoder nobody used
The model's stock workflow includes an audio decoding node. Our output is a silent looping clip, so the result of that entire computation was never read by anything.
Inheriting somebody else's workflow leaves this kind of thing behind. The way to find it is per-node timing, then asking of every expensive node: is its output actually used?
Result
One clip went from 60–80 seconds (137 in the worst case) to a steady 42–45 seconds.
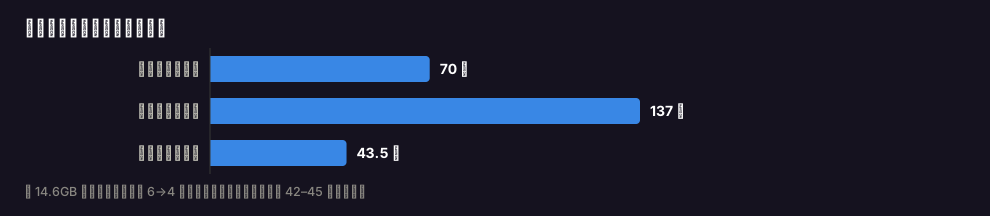
The variance collapsed too; the 137-second case stopped happening. For a user the difference is "43 seconds every time" versus "60 on average but occasionally 137".
An accidental confirmation
While testing something else, a repeat run with identical parameters took only 17.2 seconds, because ComfyUI had cached the previous encode and skipped those 17.7 seconds outright. That lines up exactly with the table above.
What was not done
- Keeping the model resident in video memory — 16 GB cannot hold 30 GB. That is hardware, and the only fix is a different card
- More aggressive quantisation — push further and the quality loss becomes visible. The point of this tool is that the person is still recognisably themselves; a few seconds is not worth that
- A smaller VAE decoder (something like TAE) — those 11.4 seconds can still be squeezed, but it needs extra nodes and the quality effect would have to be verified again. It is on the list; unfinished work does not get written up here as a result
Looking back
Three things worth remembering. Without per-node timing I would have spent the effort on sampling steps, which are a quarter of the time. When video memory is short, the bottleneck is data movement, and the optimisation has to aim at making the moved thing smaller. And a before-and-after comparison must fix the random seed, or you cannot tell whether a quality difference came from the change or from chance.